How to track offline conversions from online ads using Shopify and Meta
Seán Keown, Analytics Lead at Hookflash, breaks down how to send Shopify offline sales data to Meta Ads via sGTM to improve the accuracy of your online ad campaigns and in-store reporting.


When it comes to tracking online customer interactions in 2026, we have every viewpoint covered. A user sees an ad, clicks on it, and converts. Simple. Using GA4, Adobe Analytics, or any other web analytics tool, alongside Meta Ads, Google Ads, etc., we can track campaign performance by orders and revenue.
But where this can sometimes be misleading is when the customer doesn’t actually complete their transaction online. I may see an ad on my phone and decide to go see the product in-store before finally purchasing. According to many of the aforementioned tools, this ad click did not lead to a purchase.
So how can we help close this loop?
The attribution gap: online ads, offline sales
You may spend thousands or millions on Google/Meta ads, but your Return on Ad Spend figure will never account for revenue spent in-store.
- Customers value the in-store experience: Customers research online but buy offline to try the product in person or avoid shipping time/fees.
- Under-optimised bidding: If your Meta Ads doesn’t know that a £500 sale has happened in-store, it won’t find more customers similar to that one.
- Data Fragmentation: Manually stitching online and offline data can cause many Excel headaches (can you tell I’m speaking from experience?), and inevitably leads to “dirty” or incorrect data.
By sending our offline sales to our server-side Google Tag Manager container and forwarding them to Meta Ads, we can close the attribution loop for in-store conversions and scale winning campaigns that previously went unacknowledged.
How offline conversion tracking works
Have you ever been shopping in a store and the cashier asked for an email address and/or phone number? Our offline conversion tracking matches customer identifiers like these against the identities collected during their online browsing session.
The process looks like this:
- A user clicks an ad and lands on your website. In our case, Meta will attach a unique ID (FBCLID) and track their hashed email address.
- The user visits your store – the staff in the store will enter a customer's email that is then attached to the transaction
- A webhook is sent from Shopify to our GTM tracking server address, and is handled the same as any incoming web hit
- Offline conversion sent from server-side GTM container to Meta ads account, where the email address/click ID can be matched back to the original ad interaction.
Prerequisites: This article is intended solely for businesses with brick-and-mortar locations that use Shopify to host CRMs for both their in-store and online stores. For other CRMs, a similar logic may be possible, but I cannot speak to those for the time being. You also must have a functioning GTM server container.
How to get started with offline conversion tracking: Step-by-step setup
The primary results of this change thus far have been the immediate illumination of the customer journey. Here's a closer look at how to get started.
1. Set up a Shopify Webhook
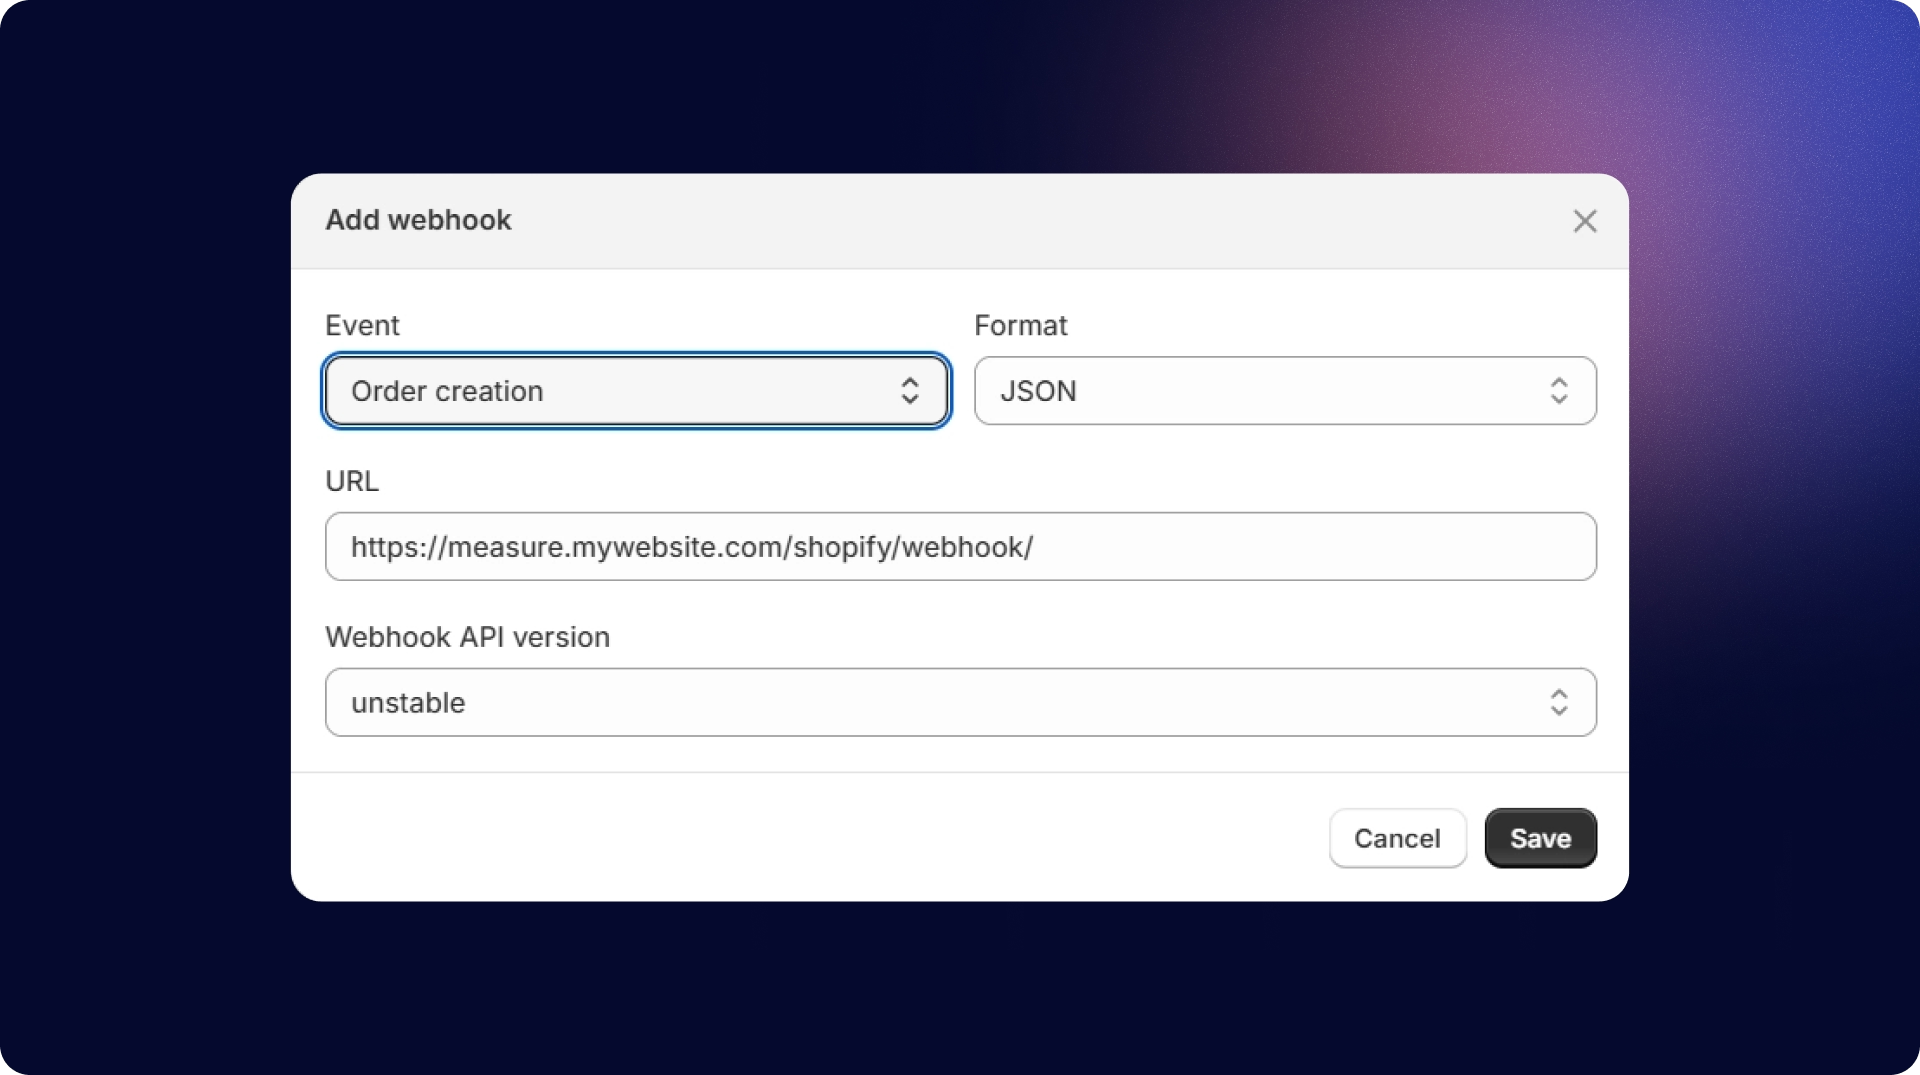
The first step that we want to do is to set up a Shopify webhook. This can be found in Admin > Notifications > Webhooks.
A webhook is a way to send automatic alerts to other platforms when a specific action occurs. You will have a few options to fill in at this stage. For our purposes, our Event value will be “Order Creation”, and the URL will be your Google Tag Manager server container domain, with “/shopify/webhook” as the page path.
Important to note that this will send both online AND offline orders – I will cover how we capture only offline conversions later in this article to ensure there is no double-counting.
2. Prepare a custom client
Now that we are sending orders to our GTM server container, we need to set up a way to collect that information.
For those not aware, a “client” in a GTM server container is a specialised resource that listens for incoming HTTP requests and translates them into a standardized internal event format. A useful way to think of a client is as someone who works in the mailroom of a large company. A client is the person who receives an incoming parcel, reads the recipient's name, department, floor number, etc., and ensures the parcel is forwarded to the correct place.
Setting up a custom client for our Shopify webhook is crucial – if we don't, our server container won’t know how to handle the incoming request and will do nothing.
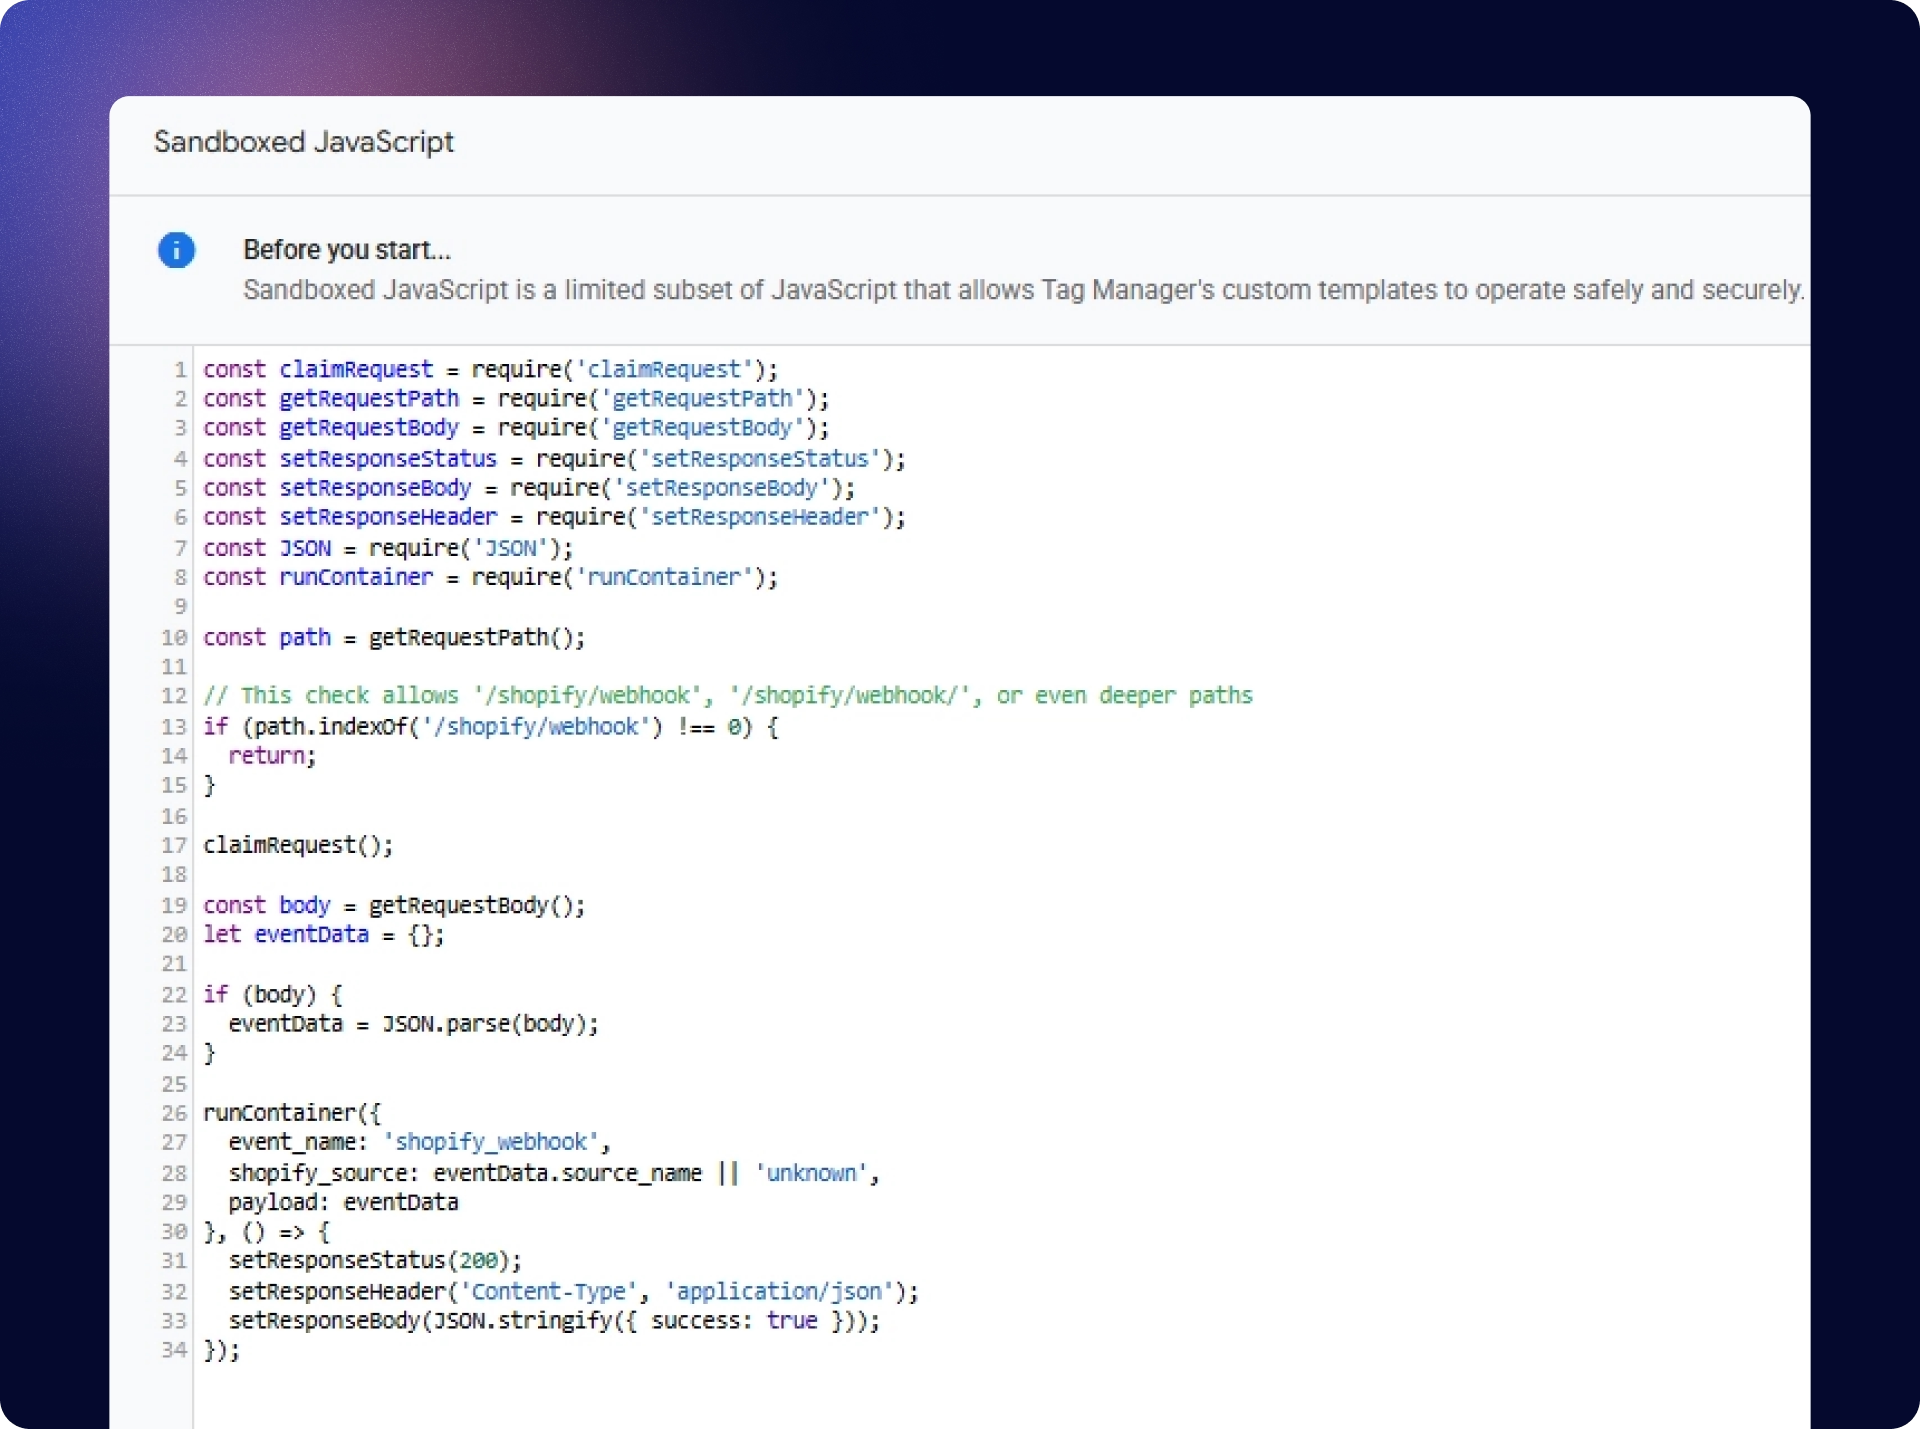
We can create our custom Shopify client by going to templates and clicking “new”. There are a few settings we need to update here, but the most important is the code section. Here, we have appended our code as shown in the screenshot. Yours does not have to exactly match; this is just a suggestion.
The code will do four things for us:
- Check all incoming requests to see if they have the page path of “shopify/webhook” that we appended to our Webhook in step one.
- Turn the incoming request into a format that GTM can work with.
- Alert our server GTM container that we have a new event called “shopify_webhook,” along with all related variables associated with that event.
- Send a quick note back to Shopify with a 200 status code to confirm that everything has been received correctly.
3. Configure tags
With our custom client configured, we can now go about tagging it up. If you have an existing Meta CAPI tag in your GTM server container, you will need to add an additional trigger so that our shopify_webhook event will fire the conversion tag.
We will also need to set up an additional event data variable for “shopify_source”. This variable is appended to the Shopify webhook and indicates whether the conversion was online or offline.
Again, it is essential that we apply this condition to our trigger to ensure we are not double-counting online conversions.

4. Quality and Assurance
All that is left now is to QA – this being offline conversion tracking, this can be a bit trickier than usual online testing, where we can complete test orders.
A useful way to test everything is to bring up the debug window and manually enter the URL value from your Shopify webhook (step 1) in your browser – you should see a success message and the Shopify webhook event appear in your debug window.
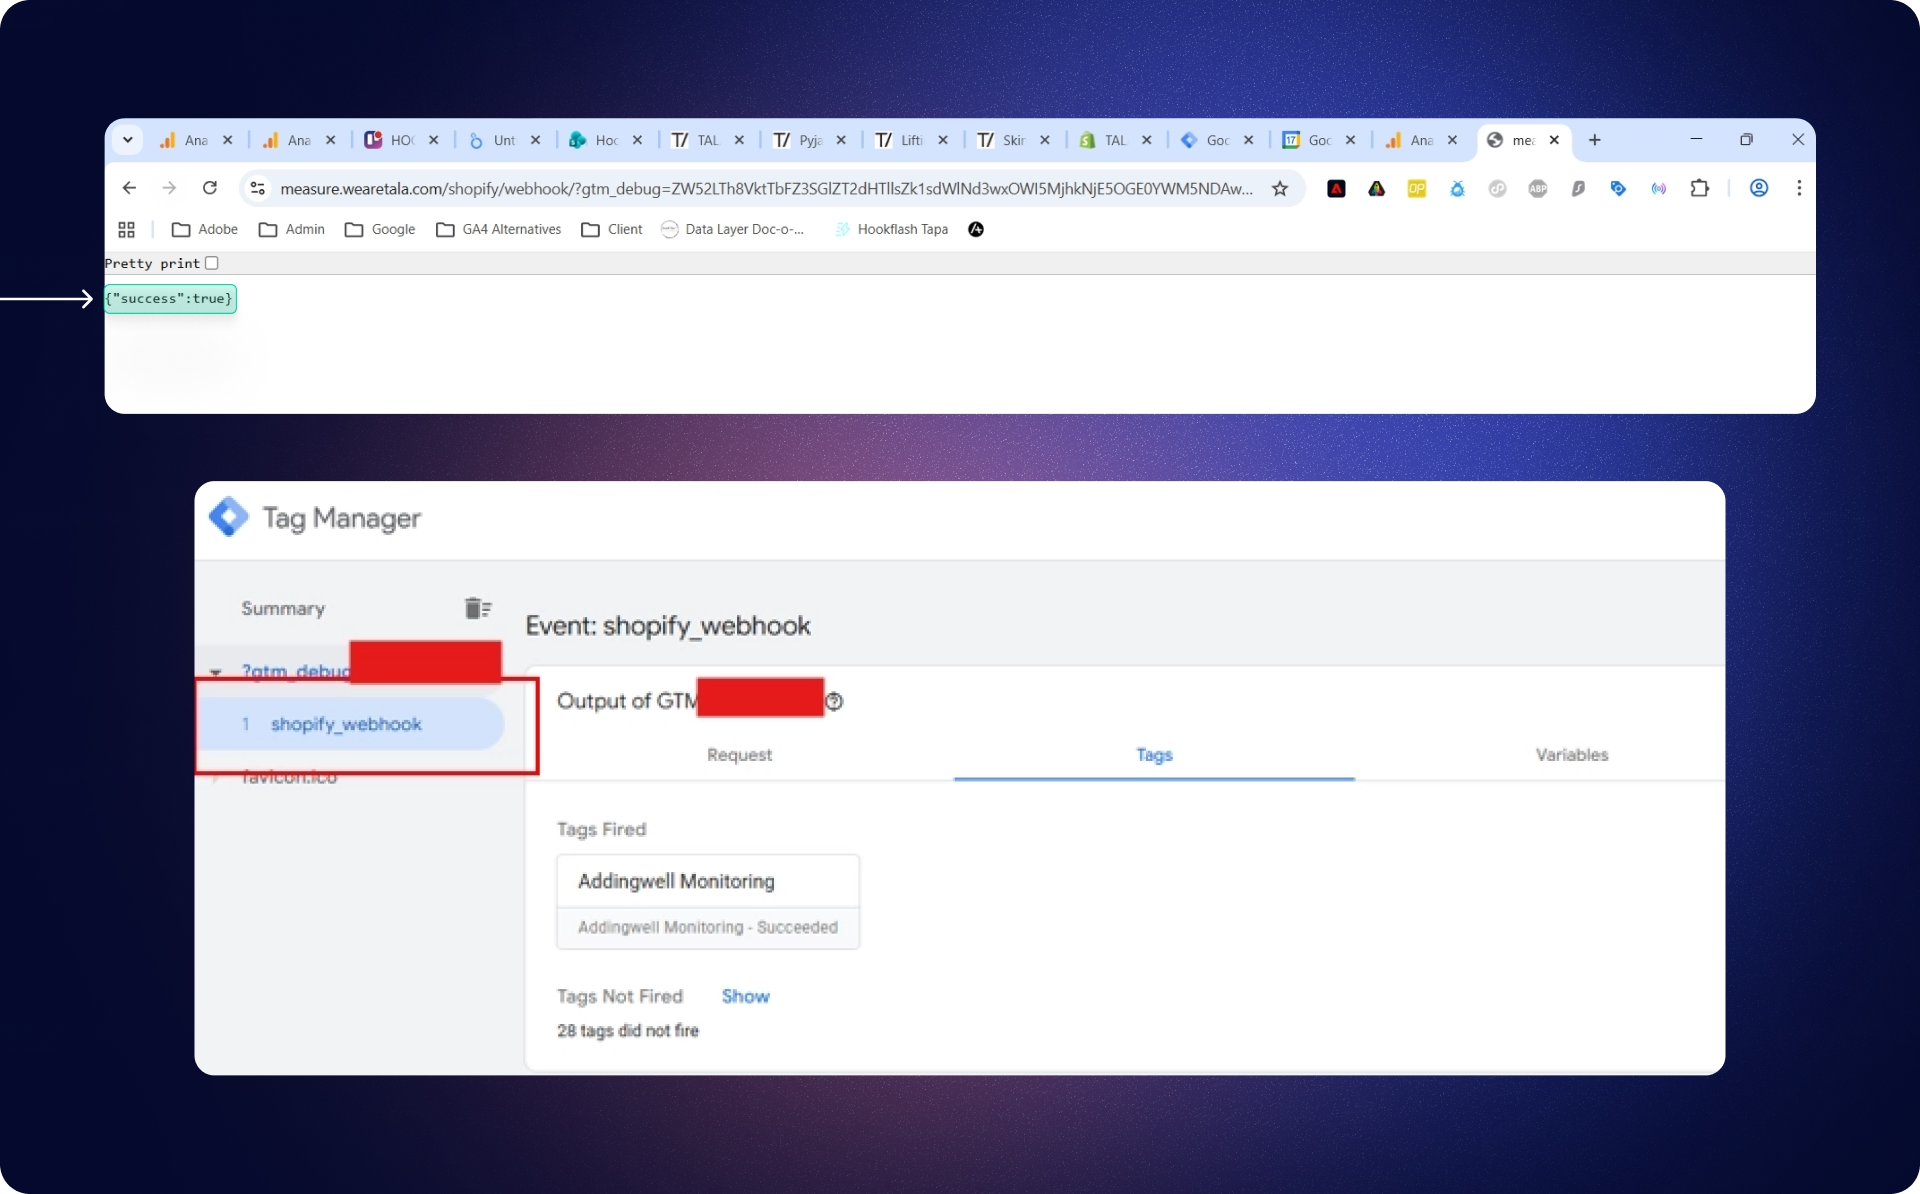
This will, at the very least, confirm that your server container is receiving the webhook data.
I would recommend that, when you first deploy this tracking, you use a different name for offline events than “purchase” (so as not to affect existing online purchase tracking for the Meta Conversions API) and monitor the data to ensure everything is tracking correctly and accurately.
Closing the loop
So now you should have the ability to send offline conversions from Shopify to your Meta Ads account! Real world, first-party data is an extremely valuable asset, and not to consider that when it comes to measuring online advertising's effectiveness is a mistake.
Feel free to reach out if you have any questions on this, or indeed any other web measurement questions, SEO, or CRO/Experimentation, via our website www.hookflash.co.uk.
The author